Showing posts with label DIY. Show all posts

Wednesday, May 9, 2012

DIY: Ikea LACK Side Table Project

How to transform this plain Ikea LACK side table:

Into this?

It's fairly simple actually. All you need is a LACK table (duh!), hammer, nail, boxes of thumb tacks, ruler and pencil.
Not in the picture is the ruler and pencil. I forgot to snap them.

First step: You gotta make holes using the nail. Make sure not to dig deep into the compressed wood or you'll end up with a big hole and can't fit the thumb tacks. I used a 1cm method for each hole. Draw a straight line along the edge of the table first. Then, mark a spot where the holes would be. Using a nail and hammer, make a hole with 1cm apart from each other.
The holes for the thumb tacks.

Second step: With holes all ready, fill them up with your thumb tacks. Make sure they are all straight and in line. You can find thumb tacks at any stationery store or DIY outlets. As for me, I bought them at ACE Hardware. I used Unicorn thumb tacks. They are durable. But any kind of thumb tacks (cheaper!) would do. Just make sure they are not rusty and don't bend much when you use your hammer.
The holes, ready to be inserted with thumb tacks.

Roughly, I used about 6 1/2 boxes of unicorn thumb tacks for a table. I spent about 4 hours of tedious work to finish this. It's not perfect because it's handmade but as long as they're cost saving, I don't mind. And here's the final outcome of the table in a good, working order.


I just need to revamp the table because it's still in good condition and needs a little refurbishment. This table has served me good and it's a waste to just throw it out. So a simple art work on it will do to restore its glory. Hahaha. Now, the table is back in action eventho it's darn cheap.

Monday, August 16, 2010

DIY Wedding Card

Johan and me, we make our own wedding invitation cards. It's in the size of passport and being me, who doesn't fancy ready made cards or those normal cards, decided to make a new one from scratch. I have zero knowledge in graphics. So when it comes to designing our own wedding card, I used MS Word as the draft.

Using MS Word, everything is a smooth because I'm so used to them and they gave me no problems. I wanted the cards to have certain Malay and Islamic influence too eventho the design is modern. So for every BM wording, I put Jawi wording behind it as translation.

Now the hardest part is the printing. There are certain pages that I print out manually. Manual means, I used my own lil printer to print out the cards in double sided for 600pcs. That's a lot, but I can save money because printing is free.

But, not everything is printed out using my home printer. For the cover and maps, I sent them out to this printing shop in Brickfields. We're used to the uncle so the thoughts of going to Pudu never existed. Haha. Here's the problem. Since my files are all in MS Word, they cannot read my Jawi translation. We've made 3 trips to discuss about the Jawi wording and on the last trip only he managed to get the Jawi coding in the right place after I successfully saved them in PDF files.

We sent the curly stickers to the uncle for printing too. Best thing is, they will do the cutting for the cards as well. See, double happiness.

Finally, the card matters are all resolved. What's left is for them to be stamped with our custom wedding stamps. For the past 2 days, I've been doing this job for Johan's card. But it's quite ugly. I don't like it. Blame my hands.


My cards are colorful, very informal. Haha! Sorry, pictures are a bit gloomy. Taken with my phone camera.

You'll think the stampings are all ok but if you have it in your hands, see it with your eyes, in real life, you can see the ugliness. :(

The stamps were ordered from Jasa Trading, Level 1, Kompleks PKNS. I gave them the print-out picture of my desired stamps, and they were ready the next day. For those 4 big stamps as mine, they costs me RM45. If they make any mistake, they'll redo everything for free and you can collect them the next day too.

Our DIY wedding cards are still slow in progress. I could say, about 40%. There are still lots of work to be done. The cutting, stamping, pasting and ribbon tying. Phewwwwww!

Saturday, January 9, 2010

Sharing Information

I just got back from OU and guess what I found? A corner punch! I've been to all three craft stores in the mall just to find the punch I've been looking for. And when I'm just about to give up, I finally found one within my budget at Craft Haven. Retails at RM28. The SA was so helpful she even tried the punch on my draft card just to make sure the curve fits the card. And it did fit nicely. I'm happy!


Corner punch from Craft Haven 1 Utama.


Oh. There's this other craft shop in OU called Scrap Book Memories (2nd floor, old wing) that sells corner rounders as well but they're a bit expensive. The smallest one is priced at RM40+. I'm not surprised because they are from Fiskars.

For your art and crafting needs, I suggest you these two outlets for supplies. They have various pre-made stamps which is fun and pretty (price varies according to the size), stamp pads in various colors, alphabet stickers and much more. Or if you prefer to shop online, I love Scrap n Crop. Otherwise, click on Sheerah for an extensive link of almost the up-to-date craft supplies in Malaysia.

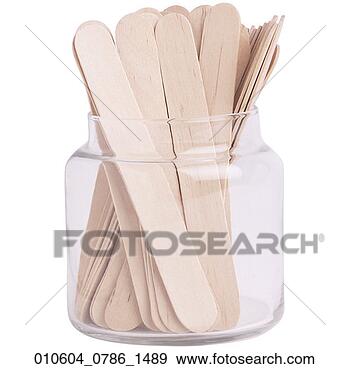
Do you still remember my post about wanting to find popsicle sticks which are slightly bigger than the usual ones? Yes, I've found it too. After googling on the net, I found the supplier. They actually supply medical products. And the sticks are actually called tongue depressor, used by doctors. But nobody can tell they're actually medical products, right? I called up Zipper Marketing. They're located in Skudai, Johor. The sticks are priced at RM5 per box, which contains 100pcs sticks inside. If you need a courier service, they charged RM10 for it. You can either call or email them for payment details. I tried emailed them and the reply came within 6 hours, which is pretty quick for a supplier company. :)


The cheap wooden sticks for my wedding program project.


Last Sunday, I went to Jalan TAR with Hanis, my little sister, to buy some kain for my bridesmaids during nikah and stuffs for my DIY project. Jakel was having sale on that day so I bought 16 metres of greenish blue crepe for my bridesmaids. Total? RM96. Happy! Then went to Bunga Riben to buy some flowers for my DIY pomander balls project. Priced at RM15.90 per pack (fixed price!). You can get 2 pomander balls done with it. Mind you, these are small pomander balls. They are priced at RM1 per ball at Sin Yin Semua House but the lady sold it to me at RM9 altogether. Hehe.


The end result of my blue pomander balls.


Do let me know if you B2B out there need more info yeah? I'll be glad to help. :)

Tuesday, December 29, 2009

Wedding Program

Remember the other day when I bought the red card papers in Brickfields? Okay, there's a slight miscalculation. That's what I get for not bringing the actual draft when buying materials. *sigh* It happens that we actually need 300pcs of A4 size red paper only! We've bought about 600pcs, and now, I'm left with half of it. In red! What to do?

So the thought came in... since there's so many leftover, I'm gonna make my own wedding program. 300pcs is just enough because not many people are used to this kind of information for wedding. Here's the ideas:


They all look basically the same. I specifically want a fan-type wedding program.

And yes, this one is in RED! Woohoo! Images are all credited from Google.


So, what info can be put on the fan? Okay, here goes. There are two sides for information, right? For one side, I plan to write down the wedding itinerary, menu and candy table information. The other side pulak I want to list down the names of the people who are involved with the wedding. Example: The bride and groom's parents and grandparents' names, the bridesmaids and groomsmen' names, the maid of honour and bestman's names, etc. Get the idea?
The things I need to find now are a bunch of popsicle sticks (preferably yang lebar macam in the pictures, not the normal stick-thin ones) and a corner punch (might be available at craft stores).


Corner punch. Picture credited from here.


Popsicle sticks. I want that size or bigger! Photo credited from here.

Do let me know if you know where can I get my hands on these.

Saturday, December 26, 2009

My Handmade Wedding Invitation Card

We went to Brickfields this afternoon to find some paper and stationary supply. I told you I'm gonna make my own wedding invitation cards. So off we went and thank God they're open. I never knew they don't close on Saturdays. Heeee!

Since this was our second trip, we've made up our mind already on what to buy and what to expect. The first time we were there we just scouting and browsed around for bargains and paper types. This time, we went straight to the first store we hopped in and settled everything in prolly half an hour.

With an RM300 budget, and 600pcs cards in the making for the wedding, we managed to get through with just a total of RM220 after the lady gave us a discount of RM4. Cheap, right?


Many types of paper to choose from. 1st picture: Calculator is essential when we're dealing with numbers. I just went dizzy with numbers. 2nd picture: The chosen one. Red card as the cover and cream color paper as the inserts. 3rd picture: Okay, that's my most reliable, almost worn-out wedding diary. I'm lost without it. ;p


The red card paper is RM2.80/pc. You can get 10 A4 size paper after cutting. We asked to lady to potong siap-siap jadik A4 so it'd be easier for us. The red card would be the cover. For the insert, we chose cream color paper. It's RM5/pack. Each pack contains 100pcs A4 size paper. We need about 1200 pcs, so we bought 12 packs totaling up to RM60.

If you've been wondering what we've been up to, here's a peek:


That's a draft of our wedding invitation passport. I made it by myself. Yes...we've asked around and it costs too much for a card like this, even in Jakarta and Bandung. So what the heck, I have the time and ideas, let's just make some to cut cost. Initially, the wordings are in Bahasa Malaysia and English. But Johan is a bit traditionalist in heart, he wanted the wordings to be changed to Jawi instead of English. Lebih kemelayuan gitu. This card is just an outline. Will start finalizing the graphic, dates, wordings, itinerary and whatnots before I produce a hardcopy and start making the cards in bulk.


On a totally different story...my FMIL just returned from Hajj last Tuesday and I only got to visit her today morning. I love the red henna she gave me. The color is outstanding. My mom and sis went wild painting our nails and toenails with the henna. It's halal so fret not about removing it afterwards like the usual nail polish. Wheeeee!

Tuesday, October 20, 2009

Wedding Passport Invitation

I've always wanted my wedding to be unique and different, well, every bride wants the same for their wedding too. Sometimes, a very little detail plays an important part.

The same with invitation cards too. That's the first impression the guests will get once they receive your wedding invitations. You don't have to order expensive hardcover cards to impress them, which will be thrown away after the event. It's best if the cards left an impact on your guests.

So, taking into account of the costs (IMPORTANT!), I decided to make my own invitation cards. In the shape of passport! I've never seen any card like that in Malaysia, so I might as well start introducing it.


Pictures from Google


I've designed my own card already. I need to change the fonts and a little bit of the stamps. The card will be made in 2 languages, in Bahasa Melayu and Jawi. We want it to have a little bit of modern and traditional elements, so guests will get the best of both world. I need to take a day off to start buying papers in bulk in Brickfields. We've surveyed already, it is very very very very very cheap to make your own card.

Good luck!

Sunday, July 5, 2009

The Best of DIY

I'm gonna DIY my wedding deco as much as I can. I'm a crafty person, and I'm not planning to waste my talent down the drain. I spend most of my time googling wedding blogs eversince I got engaged, particularly those from US because they have extensive instructions on DIYs and they do share lots of infos and spark brilliant ideas for your wedding.

HOWeverrrr, Johan wants to have a traditional Malay wedding, while I on the other hand, prefers laidback wedding (realllyyyyy?), particularly garden-themed wedding. But seeing that it's almost impossible to make my dreams come true (Malaysia is humid, I don't prefer my guests to be drenched in sweats while munching on spicy wedding food!), the only choice is we have to combine those two elements and blend it so the wedding will reflect both. You got what I mean? Traditional elements will probably have to be in terms of attire, food and yeah, pelamin maybe? However, I wanted the deco to be installed in English-styled elements. Most importantly, they must be DIY-ed. Here are my ideas. Feel free to copycat for your wedding, ok darlings? Theeheee...


ELLY'S DIY PLAN

  • When the guests come in, they'll be greeted by a section where guests will take their wedding programs and they'll be given a piece of paper/doily to write/wish us their wedding notes. Notes can either be hanged on a tree branch or put in a birdcage.

  • Wishtree for the newlyweds


    Or the birdcage notes inspiration


    • The wedding aisle/walkway will be decorated with pomanders of various sizes and must be according to the theme color. However, there will be no black pomanders as the color is too dominant. Pomanders will be in red, rich purple and white. Ok, maybe a bit of black as well. Just for the sake of it.


    Pretty pomanders for your wedding


    • Let's go green. Put the favors inside the hideous brown paper bags. Spice them up, with personalized tags/stickers. Templates for stickers can be found everywhere on the net. Stickers can be found from local stationaries in Brickfields at RM30 for 100pcs (A4 size).
      I'm planning to set up a cookies counter next to the favors table, and I'll be using the brown paper bags to pack the cookies.

    These are wonderful ideas. I'm soooooooooo gonna do this!


    Okay, I have soooo much to share actually, the ideas are endless. But let's hope ini bukan angan-angan Mat Jenin sahaja. Elly, kau jangan plan tak serupa bikin pula. Aku benci. Johan baca post ini pasti akan muntah dengan senang hatinya. Sekian, terima kasih.

      © Blogger Template by Emporium Digital 2008

    Back to TOP